Today's post is inspired by winter, snow and ice. Although I live in Southern California where we never get snow, I love being in the mountains and watching snow fall -- especially when they're those big, fat snowflakes that slowly spiral down from a night sky.
It is with that in mind that I challenged myself to create this snow globe card.
I looked on You Tube for some tutorials to get me started and got some construction ideas from Libby Hickson's blog, Libby's Little Addiction. But, in the end, I kind of winged it. Here's how it did it:
Step 1: Gather your supplies. I used paper and stickers from the Peaceful collection by Authentique that I purchased at cropchocolate.com, kraft, brown and green paper from Bazzill, twine from The Twinery, Color Box chalk ink in Moss, and pigment ink in Frost, foam adhesive and sparkle embossing powder from Recollections, Holiday stamps from Hero Arts, Perma Tac adhesive from Glue Arts, Beacons 3 in 1 glue, and buttons from my stash.
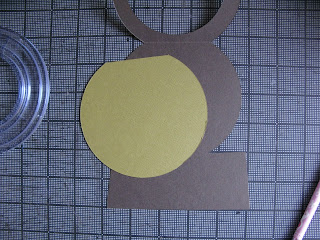
Step 2: Cut brown cardstock to 11 1/2" x 5" and fold in half. Using a circle cutter positioned slightly off the top of the fold, cut a 4 1/2" circle in the brown card -- CAUTION: Do not cut a complete circle -- you need to leave the fold intact at the top of the card and leave the circle connected to the base at the bottom.
Step 3: Cut the inner circle 3 1/2" -- this will be the opening of the snow globe. Then make angular cuts on the sides of the base of your snow globe -- 1/4" narrower at the top of the base than the bottom.
Step 4: Cut a 4 1/2" circle in contrasting paper, make a straight cut across the top to fit the inside of the snow globe and adhere.
Step 5: Now for the fun stuff -- the decorations! I cut pieces of patterned paper and Kraft card stock to layer on the base on the front and inside of the card. I also fussy-cut the bird from the Authentique Peaceful Collection (Solitude pattern paper). Next I inked the edges of all the papers and applied foam adhesive to the bird. I placed some pinecone stickers on the green cardstock and then adhered the bird on the green circle cut paper.
Step 6: Cut a 4 1/2" circle out of acetate or plastic. I used some packaging I had laying around.
Step 7: Stamp snowflakes on the plastic circle using pigment ink, cover with sparkle embossing powder, remove excess embossing powder and set using a heat gun. Be careful not to overheat the plastic -- it will melt. (I found this out the hard way!) Now, glue the plastic to the inside front of the card with the embossed snowflakes facing outward.
To finish, decorate the front of the card using stickers from the paper collection, buttons and twine and you're done!
Here is another card using this same technique I made for Christmas using Echo Park This & That Christmas Paper and stickers from Carta Bella Christmas Day collection.


Laura I love this so much! I'm honored I helped a bit to inspire it! :-) And you even used Hero Arts, yay! Thanks so much for letting me know about it!!
ReplyDeleteThis is beautiful!
ReplyDeleteGreat work Laura! The bird is a fun idea for the snow globe!
ReplyDelete